29 December 2010

Double Kanzashi Flower


Pin It!
After completing the Miss Emily Flower I decided to fool around a little bit with it and came up with my newest flower, a double layer kanzashi style flower. It is the first of my work for Valentine's Day.

This tutorial actually has 2 versions in it as you can see here. It will be available in my Etsy shop soon. I just don't know what to name it. I'm not real clever when it comes to that. I welcome all suggestions.


11 December 2010

Miss Emily Kanzashi Flower


Pin It!
My newest tutorial has taken me literally weeks to get finished. Of course most of that time I spent saying, "I gotta start on that soon". Sometimes you just get in slumps and it is difficult to pull yourself out of them.

I am in somewhat of a slump right now, probably just worn out getting ready for the holidays. I kinda forced myself to get this tutorial done. I had it to the testing stage about 2 weeks ago and sent it out to a few people to review it. I've had their recommendations for a good week or better. But today I made the revisions and have posted it in my Etsy shop.

I call this one Miss Emily, after my daughter. This tutorial includes a 2nd tutorial that I also sell separately, the Single or Double Layer Flower Tutorial #5. I made Miss Emily using cotton fabric, but you can use synthetic fabric or silk to make it too. This is just my way of making this flower, as it appears to me.


And here are a couple other versions of the same style.


Hope you like them. Thanks for looking!

22 November 2010

Peonies & Roses: A Christmas Stocking


Pin It!
Every year my church holds a raffle as a fund raiser and every year I make a one-of-a-kind Christmas stocking and donate it. I enjoy making them and it is challenging to come up with new designs every year.

Most of the time when I am designing something I let the fabric guide me. This year I couldn't decide between 3 different fabric collections, I wanted to make them all. So in addition to the stocking I made for the church, I am making 2 more to put in my Etsy shop.

The stocking pictured here is made from the Aviary Collection by 3 Sisters for Moda Fabrics. I actually used a honey bun to make the cuff. I chose the rose and ivory tone strips to make it. I made a scalloped edge and added some decorative topstitching in pale pink and added faux pearls.

The main part of the stocking, both front & back, is made using ivory bird eggs, a wonderful fabric so reminiscent of the Victorian period, I think. I used a pre-quilted ivory fabric for the lining.

I made a floral spray with a large peony as the focal point, a smaller peony bud, and some pink roses here & there. There's a pink & ivory satin ribbon bow with a faux pearl center as an accent.

Look for this stocking and more at my Etsy shop. I hope to see you there.


04 November 2010

Quilted Christmas Ball Ornaments


Pin It!
I have just listed this newest of my tutorials, the Quilted Christmas Ball Ornament. I first made this a couple months ago as a gift for my Mom, you can read about that here.

Recently my daughter and I sat down and made some more of these and created this tutorial to list in my Etsy shop.

These are limited only by your imagination. They require only scrap fabric and trims plus a few other things.

Here is the one I made for my Mom:


This next one, Mr & Mrs Frosty, was created by my daughter.


Here is my Jingle Bells ornament:


Here is my shabby cottage chic ornament:


and here is my red plum ornament:


Thanks for looking!

03 November 2010

Tracey's Treasures


Pin It!
Recently one of my lovely customers, Tracey Lipman, wrote to me to show me what she's been up to in her Etsy shop, Tracey's Treasures. She had purchased my Single or Double Layer Fabric Flower and adapted it a little and added it to all sorts of wonderful handmade goodies she has in her shop.

I just love these Stroller Bag Caddies. They attach over the handle of your stroller and will hold all the essentials and keep them close at hand. There's compartments and pockets and they even have a key fob. And check out the beautiful fabrics she's used.

This one is a beautiful lilac and green.


And this one is pink striped with green. I love it!


With the big shopping season coming up, these are a must have to keep organized and not lose things. I recommend getting one!

Tracey also has these sweet little wall dolls.

This little one is named Violet. She is about 10" tall and is adorable. She has a hanging loop on the back to hang on the wall and will put a smile on your face when you walk into the room. You just can't resist her!


Check out Tracey's Treasures for handmade polymer clay and Paverpol Judaica, art jewelry, tutorials and home decor items. And right now because of her "Miracles of Hanukkah Sale",  if you spend $10 or more Tracey will refund 10% to your PayPal account. This offer is limited so please visit her shop.

And if you'd like to make flowers like the ones used here please check out all my beautiful flower tutorials here. And while you're there why not visit my shop and see my other goodies and drop me a line, I'd love to hear from you.

21 September 2010

Felt Flowers


Pin It!
One of my favorites materials to work with is felt. I have made felt flowers to use as decorations on various things and decided to put them into pdf form and share them in my Etsy shop. I finished 2 so far, with a couple more in the works.

Here I have a poinsettia type flower.


The poinsettia tutorial includes this daffodil flower.


I also just finished my Felt Sunflower.


Thanks for looking.

06 September 2010

The Start of a Tradition


Pin It!
My Mother requested a special ornament for Christmas this year. She asked for something classic with crimson and gold, something with poinsettias. And, she told me, if I did a good enough job on it she would get some orders from her friends, lol.
Well that got me thinking. I have seen the beautiful ornaments made by Darlene in my previous post. And what an inspiration those are. So, I attempted to make one of those, but it did not turn out too well, but it got me thinking. Then it hit me to try to cover my ornament ball with felt, which I love working with.
It turned out to be an interesting project for sure. I hadn't covered a ball, or made a ball shape thing before so it was with much trial and error, until I finally got my felt to fit right.
I used a beautiful ivory colored felt and embroidered the year for the front panel and added little twinkly stars about the rest of the ball. I also cut flower petals from crimson felt and embroidered gold veins in each petal. I made a large poinsettia for the top, 2 small ones in front and a medium size one on the back. There is metallic gold ribbon topped with a gold and pearl twist trim. There are also pale leaves trimmed in gold glitter on top and more shiny gold ribbon, both as a little filler and as the hanger.
I enjoyed making this Christmas ornament and I think it turned out pretty good. Mom loved it and requested that I make her one every year now! Maybe I will even get some custom orders, who knows!


02 September 2010

Prairie Creations Ornaments


Pin It!
I would like to show off the beautiful work of one of my Etsy shop customers, Darlene, from Prairie Creations Ornaments.
She makes these fabulous unique quilted ball ornaments. She makes them for all seasons and holidays and welcomes custom orders for special occasions.
Darlene purchased my Single or Double Layer Flower Tutorial  and my Scrappy Loopy Flower Tutorial and used them in such  creative ways.
Here she added the Single or Double Layer Flower to accent the top of this fun Pumpkin Quilted Fall Quilt Ball Ornament. I think it is just perfect. I love the colors, I could see myself having a few of these.


Look how she used the Scrappy Loopy Flower. It's very nice on this Christmas Heart Scrappy Bow Quilted Bow.


Here is another example of her beautiful ornaments for Christmas, this gorgeous Frosty Snowflake Quilted Christmas Quilt Ball Ornament. I know you love it! You will want to decorate your tree with several I'm sure. Or display them on a stand!


Here is an example of a unique commemoration of a special occasion, a Custom Made Quilt Ball Ornament with Stand for 50th Golden or 25th Silver Anniversary.


Please visit Darlene's shop and see all her beautiful ornaments or drop her a line and make a custom order. You'll be happy you did.

26 August 2010

Giggle Girls


Pin It!
I had the wonderful occasion to do business in my Etsy shop with Stacie from Giggle Girls. Take a look at this beautiful shop and all the gorgeous goodies she has.

If you are looking for something special for your little girl you will surely find it here. She has sweet glitzy tops and boutique bottoms, preppy pillowcase dresses, sassy jeans, rompers, dressed up flip flops, frilly boutique hair bows, and check out one of her newest items, the Fabulous Flower Necklace.


Stacie made this beautiful necklace using the Fabric Flower Bib Necklace PDF Tutorial I have offered in my shop. I think it is wonderfully perfect and would be fabulous on your own giggle girl.

All of Stacie's items are pretty awesome, but if you would like a custom Giggle Girl item she can do that too! Just contact her about that.

She also has a Giggle Girl blog where you can read about her creations and keep in touch with the latest.

21 August 2010

Computers, Cameras, & Photos


Pin It!
I have a definite love/hate relationship with computers and electronics. I'm sure most would agree that it's all something you can't live with and you can't live without. But since I have an online business it's a necessary evil.

I have a desktop computer that runs well, it's dependable, but it is very slow. I definitely need to get a tune-up on that one. I have been using only a desktop computer for a number of years and they have served me well. However, I admit that a couple years ago I was really seeing the need for a laptop. I mean how convenient it would be to sit in bed or a recliner and write blog posts! And what a boost in productivity to be able to tote around a mini workstation. Well needless to say it didn't take much to talk myself into buying one.

That was 2 years ago. During that time my poor desktop was rarely used, it was saved for the big boy jobs that I couldn't use my laptop for because it didn't have this or that particular program. Over the last few months my beloved laptop started showing me signs that it was on its way out.

First my battery AC adapter quit working. It was replaced by the manufacturer. Then it quit again, this time after the warranty expired. I replaced it. Then my wireless card quit. I decided to get an external contraption so I could get online. And all during this time the laptop was making loud noises and getting very hot and I actually had to quit playing Farmville, lol. I bought a fan and it helped some. I also had the forethought to buy some other contraption to back up all my files, which proved to be genius on my part, lol. And then the AC started acting up again until one day when it wouldn't charge my battery at all. So when the battery died, so did my ability to use my laptop.

Decisions, decisions. Should I get this one fixed or put out the money for a new one? I decided to get a new one. I bought a Toshiba and it has Windows 7 on it. That is a new OS for me. And Toshiba is new for me too. So I spent the last couple days getting used to it and putting some files on it from the old laptop. While I was at the store I bought a wireless printer, scanner, copier thing. It's still in the box, though, mainly because I haven't found a spot to put it. I wonder if I could keep it downstairs in my studio and expect it to print out stuff from upstairs. That's a thought I will have to investigate.

I also shopped around for a new camera. I found the Nikon D90 and boy oh boy, that would be nice. But unfortunately it is way out of my business' budget. And besides I am not a professional photographer, I know very little about it actually and I don't think I could ever take pictures worthy of that camera.

I have been working a little on retaking photos for my Etsy shop and I've been doing pretty good, if I do say so myself. I am trying to be very conscious of my background and of lighting. My next hurdle is to get pictures of  live models wearing my items and to have interesting and appealing props. I am not doing to well with that. And actually I am almost to the point of hiring a professional.

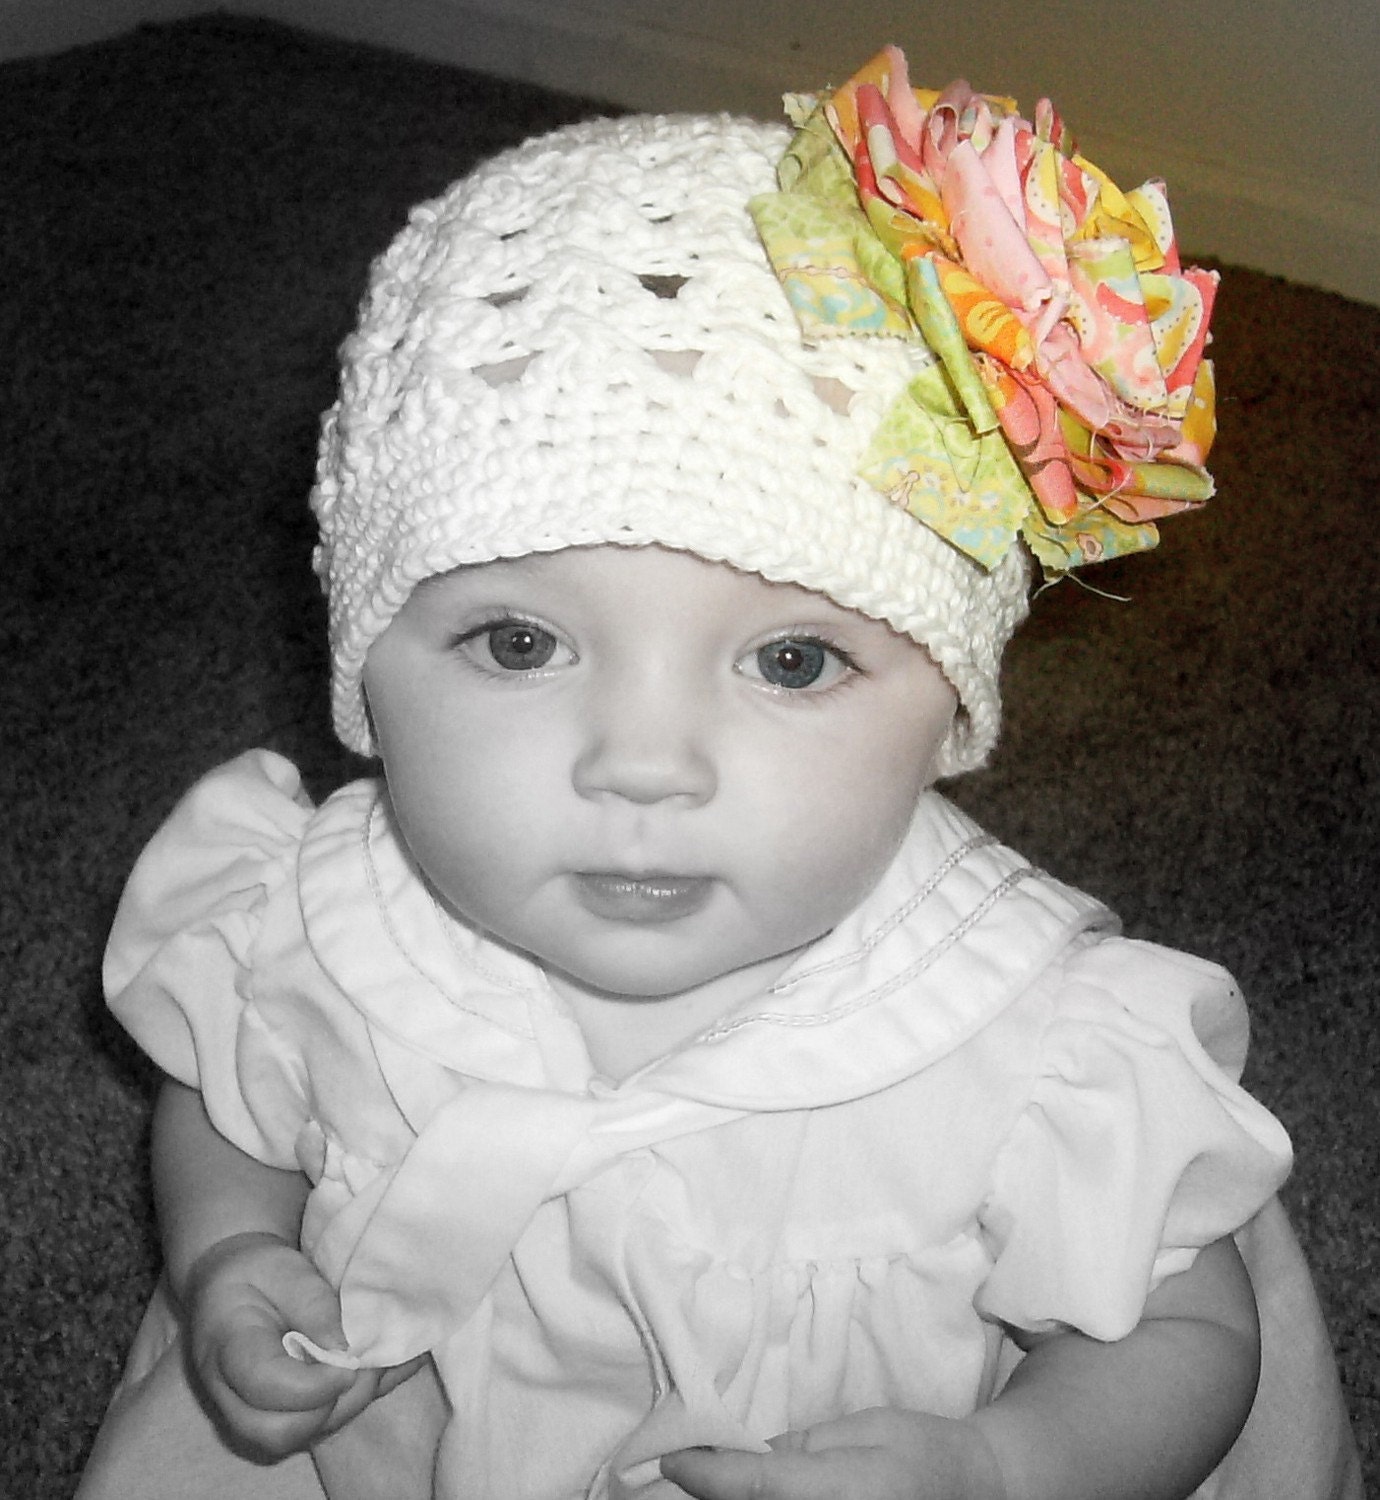
Here are some examples of my pictures using live models.


I like the look of the black & white photos and only having the flower in color. I wish I could do that a little better. I am not entirely convinced they make good product photos though. And wow! how difficult it is to take pictures of a bouncing baby.

So I think that is next on the agenda~~a professional photographer. In the meantime I will continue taking pictures of these 2 beautiful models. Thank you Patience and Aurora Sky, you guys are great!!

14 August 2010

Meet jp pinkdaisy


Pin It!
Recently I have asked my customers who have purchased my tutorials to join me here on my blog where I can talk a little about them and show off some of their treasures. 

I'd like to introduce you to Judie, a fellow Etsian, and her darling Etsy shop, jp pinkdaisy. Judie has handmade, wearable art that is unique and vintage inspired. 

Judie has some sweet hair accessories in her shop, so shabby and chic. She's got handmade hair clips and fantastic crocheted headbands and more. Take a look at a few here.


This beautiful Kanzashi style fabric flower clip is called The Camilla. I just love the colors! You can find it here. Judie used my Folded Fabric Flower PDF Tutorial to make it and it would be perfect for your little girl. 
This little beauty is a rolled ripped fabric rosette hair clip in pink and green camouflage. I think it is too sweet! And you can find it here. It is a one of a kind and I bet it won't last long! 

Judie is currently working on new designs for necklaces and belts which she will be adding to her shop soon, so stay tuned for those. And she loves doing custom work as well and welcomes your requests. 

She is always working on new things and many are one of a kind so head on over and grab your goodies before someone else does.


03 August 2010

Crafting With Patience


Pin It!
Today Patience and I decided to make some quick and easy flower hair clips. She found some artificial flowers at the craft store that she liked so we brought them home.

This is definitely a project she could do mostly by herself so I let her have at it. After all, she is the designer behind my Miss Patience Bag which is for sale in my Etsy shop. And she is 9 years old, I'll have her on a sewing machine before long.

What you need to make the Miss Patience Flower Hair Clip is a small artificial flower, a small scrap of felt, a shiny rhinestone, a snap clip, needle and thread, scissors and glue.


You have to remove the hard plastic parts from the middle of the flower. Then keeping the flower layers lined up, sew the layers together with a couple of stitches close to the middle.


Now glue a small felt circle onto the back of your flower.


Pick out a shiny rhinestone and glue to the center of your flower.


Now glue your snap clip on the back.


And that's all there is to it!


Miss Patience and her flower clip.
Related Posts with Thumbnails