25 April 2012

New Dress Designs


Pin It!
I have added some girls dresses and skirt sets to my Etsy shop. These are my new designs which I have just recently finished.

This is my Handkerchief Dress, modeled by Miss Aurora with her brother, Xavier.


This is another Handkerchief Dress.


This is my Ruffle Swing Skirt and Ruffle Halter Top.


You can purchase both tutorials in one or buy the skirt by itself here.


I also have this little double layered skirt dress, which isn't listed just yet.


15 March 2012

Fabric Carrots


Pin It!


Fabric Carrots sewing pattern available in my Etsy shop here.


Bow Tie Easter Basket


Pin It!


The bow tie version of my Easter basket for your little feller. The tutorial is available in my Etsy shop here.


12 March 2012

15 Minute Scrappy Barrette


Pin It!
I have a hard time throwing away even the smallest scraps and so I'm constantly trying to come up with something to do with them.

These scraps are only about 4" or 5" by 1/4" to 1". Most would toss them right out. They're too sweet for that. I used some ribbon scraps too.


Well just stack them kinda next to/on top of each other. Wrap thread around the middle really tight and tie it in the back. Cover thread with another fabric or ribbon strip, glue or sew it in the back. Leave it as is or glue a button on.


Trim your pieces as needed. Separate the strips and arrange them as desired. Attach snap clip on the back and that's it.


11 March 2012

Simple Gathered Skirt Tutorial


Pin It!
This is a super quick and super easy tutorial for making a nice little girl's skirt (or for big girls too), cute enough for everyday of the week. And very simple to change up for different looks, add some piping, rickrack, pockets, a bow, bias tape, some buttons...

I'll show you a skirt with a contrasting panel on the bottom, but you can make it without it.

There are no pattern pieces to print out, just take a few measurements.

1. Measure waist. I'm using 19"
2. Measure desired length of skirt. I'm using 9"

You need 2 pieces for the main skirt piece. Cut each main skirt piece 1/4" longer than desired length (mine is 9 1/4"). The width of each is the waist measurement plus 1" (mine is 20").

You need 2 pieces for the contrasting panel. Cut each piece 6 1/2" long by the same width you used for the main skirt piece.

I used 1/2" elastic, cut to waist measurement plus 1".

Use 1/2" seam allowances unless stated otherwise. Place pieces with right sides together, sew side seams. Overcast seams if desired.

Fold panel piece in half with wrong sides together and raw edges even. Press.


Press under 1 1/4" on lower edge of main skirt piece. Open pressed edge. Pin panel to lower skirt edge with raw edges even and right sides together.


Stitch together with 1/4" seam, overcast the edge if desired.


Fold piece on fold line. Stitch main skirt piece to panel at 1" in from fold.


Press the top edge under 1", then press the raw edge under 1/4". Pin and stitch close to edge leaving a section open to insert elastic. Insert elastic in casing (I used a safety pin to do it).


Overlap ends of elastic and stitch together. Stitch opening closed.


To keep the elastic from twisting you can stitch down both vertical side seams, be sure to adjust the gathers and elastic and make everything evenly distributed first.


And that's pretty much it. You can add your embellishments now. Hope you like it!


If you don't want to make the skirt with the contrasting panel you will need to change things a bit. Cut your skirt piece using the same width measurement, but add 1 1/2" to your desired length measurement. Then just skip the panel instructions. Make a narrow hem at the bottom by pressing under 1/4" and then 1/4" again. Stitch in place.

I duplicated the owl to embellish a simple t shirt. I made it with felt and fabric scraps. Sew the pieces onto the owl body first. I sewed on 2 small buttons for pupils and added a fabric flower on his belly. Then use heat n bond to adhere the piece to the shirt and stitch around the perimeter.


25 February 2012

Easter Basket


Pin It!


This is my newest fabric Easter Basket. I have the tutorial available in my Etsy shop.


15 February 2012

More Fun with Buttons


Pin It!
Simple covered button ribbon headband.
Make a leaf from ribbon. Gather and tie at the bottom.

Thread ribbon through shank. 
Tie loose knots between buttons. 
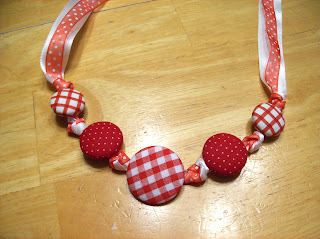
Make a ribbon button necklace.


11 February 2012

Buttons Buttons Buttons


Pin It!
I think everyone loves buttons. They're so versatile and come in all shapes, sizes, colors, materials.

I just love button bracelets. Here's the one I made today using this excellent tutorial from Aunt Peg's Jewelry. This is my first attempt so don't look too closely. I think it's cute though.


I think I could get into this bit of crafting!


04 February 2012

Embroidered Paper Doily Hearts


Pin It!
I bought some paper doily hearts from the dollar store thinking I could do something with them for Valentine's Day. And this is what I came up with, I used embroidery thread and ribbon to prettify them even more than they were.


You can make them as simple or ornate as you want. Let your imagination run wild. Maybe use some beads or pearls, glitter, colored pencils, paint, etc.

You may want to double up on them before you start 'cuz they are kinda thin. And be careful 'cuz they tear easily.

You can even make little pockets and fill them with goodies for your sweetie!

04 January 2012

Pacifier Pouch Cubed


Pin It!
When baby Liam was born on Dec 2, my daughter requested that I make her a paci pouch. She wanted it to hang from the diaper bag with a plastic link toy. She then wanted another to hang from the stroller and one to keep in the car.


So I came up with this cute little cube shaped zippered bag. It is small --- only a 2 1/2" cube. It holds a pacifier or 2. Or it can be used to carry all sorts of small items so they are easily found. You can attach a strap and carry it as a wristlet or add it to your key ring.

This tutorial is available here in my Etsy shop. It is a quick and easy project and an excellent way to use those precious fabric scraps you've been hanging on to.


Related Posts with Thumbnails